Saturday, April 30, 2011

Barbie House

This craft is for the Mom's out there.
I know what it's like when you don't have money to buy things for your children. When my daughter was very young, I didn't have money to spend on expensive toys at Christmas or on birthday's. I barely made ends meet and the money went to bills and necessities.
Therefore, I had to come up with a way where I could still do nice things for my daughter. Things she would be proud of and treasure. Well, my daughter loved Barbie's and so I decided to take on a very large project and make her a Barbie Dollhouse.                                                                                       
I was very crafty and good with my hands. I went to Staples and collected heavy boxes (like the kind the put copy paper in). I then asked everyone who worked in an office to save me some boxes too.                         
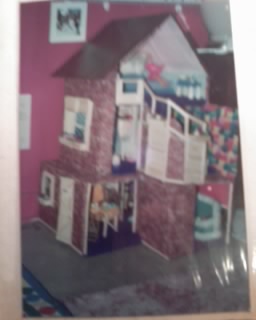
When I had about 10 boxes and a few really big ones too I began taping and gluing the boxes together with duck tape. I made a huge house but you can make any size house you wish. You have to make sure the box is high enough for Barbie to fit in. This is very important.                                                                                 
The Barbie house I made was about about 4 and a half feet tall and 5 feet in length. It was big and it took up allot of space. It had a kitchen and a living room on the first floor. Two bedrooms and a bathroom on the second floor and a bedroom with a rooftop garden on the top floor and then I made a separate building, which was the stable. It even had lights. (I used Christmas lights. The small kind.)
This house was the talk of her friends. All the girls wanted to go to Francessca's house to play Barbie's because her house was fun and her Mom made neat things.
These are the Materials You Will Need:
·       Sturdy Boxes
·       Duck Tape
·       Glue Gun
·       Glue Sticks
·       Several yards of colored fabrics and also some remnants (I buy brick patterned fabric, furs, prints for each room to make it look unique.
·       Laces, ruffles, colored Mardi Gras beads
·       Accessories (little Barbie things you can use to accessorize your rooms, go to the dollar store and you can get a kitchen stove etc...Save little medicine cups, and things that you can use for a sink, tub etc...

Directions:
·       Begin securing boxes into place. Use allot of hot glue on the sides and tops. Once it is secure with glue then begin duck taping all sides, bottoms etc...Don't be afraid to use allot of tape as you want it to last forever and you want it to be secure.
·       After each box is taped and secured you can add doorways if you want. If you choose to cut doorways, you will need to tape them very good as well.
·       Now you are ready to begin covering each room in fabric.
·       Walls--Choose a design for each room. In my kitchen, I will use a fabric that looks like it can be a kitchen such as apples or roosters, gingham. You want to glue it on all three walls (sides and back wall).
·       Floors--I usually make the floor a solid color. Sometimes I will use felt, fabric or fur in some rooms. (You can brick and even wood style fabric at fabric shops.
·       Bedrooms--You can decorate with fur flooring. Get your child involved and let them help pick out the fabric.

Friday, April 29, 2011

Caterpillar Craft

Fuzzy,wuzzy catepillars....
Many years ago I made this caterpillar craft with my nieces and nephews . And then again later when my daughter was old enough.

This craft is so easy and it's been around for ages. This is a fun craft for any time of year but especially for spring!!

What you'll need:
  • Pom-poms, in various colors and sizes
  • Tongue depressor sticks
  • Google eyes
  • Elmer's Glue or crafts glue
  • red felt
Directions:
1.    Choose 5 colored pom-poms making sure 1 is bigger than all the rest.
2.    After you have chosen, the pom-poms glue them to the tongue depressor making sure the biggest one is first.
3.    Now glue two of the google eyes onto the face of the caterpillar. If you would like to make the happy version with a nose, cut a smile and a nose out of the red felt and glue it onto the face of the caterpillar.

Here's a nice story by Eric Carle that your children may enjoy!


Thursday, April 28, 2011

Bird house

Don't you just  love to sit and watch the birds fly around the yard. Their wings fluttering so fast. Some are such beautiful colors. Have you ever seen a Oriole (not the cookie either!) or perhaps a hummingbird? 

It's nice to teach little children about nature and allow them to partake in helping do something nice for these tiny little creatures.

Make this very simply designed birdhouse using things that you have right in your kitchen.

Materials
  • Clean 1-liter soda bottle
  • Craft knife
  • 2 old wooden spoons
  • small eye screw
  • Length of twine for hanging
Instructions
1.   Start by drawing a 1/2-inch asterisk on the side of a clean 1-liter soda bottle, about 4 inches from the bottom. Rotate the bottle 90 degrees and draw another asterisk
2 inches from the bottom. Draw a 1-inch-wide circle opposite each asterisk, as shown.
2.   Use a craft knife to slit the asterisk lines and cut out the circles (a parent's job). Insert a wooden spoon handle first through each hole and then through the opposite asterisk, as shown.
3.   Remove the bottle cap and twist a small eye screw into the top of it for hanging.
4.   Finally, fill your feeder with birdseed, recap it, and use a length of twine to hang it from a tree.

Here's a different birdfeeder I found on YouTube

Wednesday, April 27, 2011

Ladybug Rocks

Summer is almost here and with those warm cozy days come cute little ladybugs.

My niece and nephew live out in the country.  Their house is situated out in the middle of nowhere and every year when spring comes they get a ton of ladybugs. I am not talking about one or even five ladybugs. I am talking about literally thousands of the cute little creatures.

When my little nephew was little about 1-2 years old, his Mommy caught him eating ladybugs! Of course she was horrified but after talking to the pediatrician he calmed her fears and told her they would not hurt him. (Nice to know, I suppose!) lol
This is a fun craft that kids can do. If it's a big enough rock it can be used as a gift. A paper weight,perhaps a door stopper,even a stepping stone for a garden. There are endless possibilties I am sure.
Materials:
Rocks
Spray Vanish
Non-toxic paint
Paintbrushes

Directions:
Clean rocks with warm soapy water then dry thoroughly or lay on a terry cloth towel to sun dry.
After they are dry paint rocks and allow them to dry. Drying may take a few hours for each.  It is very important to let rocks dry completely before adding a new color or else the colors will run. When done Mom can coat with some vanish.

Just follow the picture to see how the ladybug is painted. It's not difficult at all.

Monday, April 25, 2011

Colored Rice Mosaic

I love mosaics. You can make this craft work for all ages. You can make this create designs as simple or as difficult as you like. This craft is a non-toxic alternative to glitter and sand for the young artist. It is inexpensive and a fun craft.


Materials Needed:
           
·        Uncooked white rice
·        Food color
·        Vinegar
·        Foam board or cardboard
Directions:
1.     Place 1/2 cup rice into a bowl.
2.     Add ~ 5 drops of coloring
3.     Add 1/2 tsp. vinegar 


Set the colored rice aside. Spread flat onto a baking sheet. Bake at 200 for 45 min to dry.
***You may wish to make more colors at the same time. 

Be sure to keep the colors separated when baking.  After they dry, you can put them in plastic containers or in plastic baggies.

When ready to do your picture draw it on the cardboard or foam board. Then use white glue and trace the area you wish to color in rice. Do each area of the picture in a selected color and when completed allow to draw for several hours.

Sunday, April 24, 2011

Happy Easter To My Readers


Hi...No craft today,sorry. I hope everyone is having a great Easter. Last night we dyed eggs. I know many of you have this tradition. Here are some of our colorful easter eggs that we did. My daughter and I decorated them, well my daughter did most of them. She's 17 but I still expects me to hide her basket.

Happy Easter Everyone!!!

Saturday, April 23, 2011

Make Your Own Play-Dough

This is a fun project as well. My daughter and I made this for the first time 14 years ago when my daughter was in pre-school. I love this Play-Dough Recipe because it is super easy and quick to make. You can make different colors by making several batches and just change the food coloring.  The play dough can be stored in air tight bags or plastic airtight container.

Materials:
  • 3 cups flour
  • 1 1/2 cups salt
  • 3 cups water
  • 1 tablespoons vegetable oil
  • 1 tablespoon cream of tartar
  • a few drops of food coloring (color of your choice)

Directions:

1.    Mix ALL of the ingredients in a large pot
2.    Cook over medium to low heat, keep stirring,until the dough comes away from the edges of the pan and becomes thick so it is difficult to move the spoon.

3.    Remove from heat.
4.    Let play-dough cool in the pan until it can be handled.
5.    Turn play-dough out on counter or on wax paper and knead 3 - 4 times.

Lastly, now play and enjoy!!!


Friday, April 22, 2011

Make Your Own Play-Dough

This is a fun project as well. My daughter and I made this for the first time 14 years ago when my daughter was in pre-school. I love this Play-Dough Recipe because it is super easy and quick to make. You can make different colors by making several batches and just change the food coloring.  The play dough can be stored in air tight bags or plastic airtight container.


Materials:
  • 3 cups flour
  • 1 1/2 cups salt
  • 3 cups water
  • 1 tablespoons vegetable oil
  • 1 tablespoon cream of tartar
  • a few drops of food coloring (color of your choice)
Directions:

1.    Mix ALL of the ingredients in a large pot
2.    Cook over medium to low heat, keep stirring,until the dough comes away from the edges of the pan and becomes thick so it is difficult to move the spoon.

3.    Remove from heat.
4.    Let play-dough cool in the pan until it can be handled.
5.    Turn play-dough out on counter or on wax paper and knead 3 - 4 times.

Lastly, now play and enjoy!!!

Thursday, April 21, 2011

Bean Bag Socks

Here is a simple solution, for the mysteriously abandoned socks. Children will love to play "Hot Potato" or any other kind of imaginative game and if they are like my nephews will end up trying to swing them at each other in a game of tag!.

Materials:                                                                                                                              
Unmatched socks
Dried beans


Fill the sock with about 1 cup of dry beans or rice.
Tie the end and pull to tighten or like I did; you can fold the edge over  cut off any access and sew  it shut

Wednesday, April 20, 2011

Homemade Stress Ball

***Parents--- this project is NOT RECOMMENDED for children under the age of 5***                                                                                                                                                          
I found this online and I am mad as I can't recall the website but it seemed really fun and I know the older kids would enjoy it or maybe it could even be used for a science experiment. Did you ever see those stress balls or that squishy ball they offer to you when you go to get blood drawn. Well, this is similar but a homemade version
                                                                                                                                               
You’ll need :
Latex Balloon (strong helium type is best)
Cornstarch

Directions:
1.      Blow up the balloon to stretch it, but do not tie the end!
2.      Use a funnel inside the opening of the balloon to pour cornstarch.
3.      Do not stretch the balloon. When the balloon feels tight (without stretching the balloon) stop. (It should be just a little bit bigger than an egg)
4.      Now tie the balloon securely and you are done. 
The more the ball is squeezed, the softer it gets!

Tuesday, April 19, 2011

Pizza

Children especially the little ones love to help their parents, teachers and caregivers. They love to please. So I thought this was a fun project to get them involved.

MUFFIN PIZZA
INGREDIENTS:
4 English Muffins
1 package sliced pepperoni (optional)
1 package shredded Mozzarella Cheese
1 jar Pizza Quick Sauce

PREPARATION:
Split English Muffins. Toast lightly to brown. Spread each half with the Pizza Quick Sauce. Place some pepperoni on each muffin. Top with lots of Mozzarella Cheese. Bake 350 in oven until the cheese is melted and bubbly.

ENJOY!!

Monday, April 18, 2011

Potato Prints

I remember doing this craft with my niece and nephews when they were younger. This is an easy and fun craft. Let your kids be creative and just have fun.

**There is some simple preparation involved before allowing your children to begin. Parents must prepare the potato before children can begin.
Materials Needed:
           
·         Potatoes 
·         Poster paint or tempera
·         Paper or cardboard
·         A sharp knife
·         pencil

Directions:
·         Parents, Cut potatoes in half.
·         Draw desired design onto potato with the pencil. (Star, diamond, squares etc...)
·         Parents, Carve out the design
·         Place paint in tray or paper plate in a thin layer.
·         Press potato design into paint and firmly press
onto paper.


Sunday, April 17, 2011

Dry Bean Mosaic

With May, soon approaching here is a great idea for a Mother's day gift. Any type of dry bean such as, legumes, red beans, peas, lentils,even jelly beans etc. Dry beans come in a variety of beautiful color and shapes. (**Parents, jelly beans would be more costly but they can also be used. You can often buy jelly beans at a reduced cost after the Easter holiday.)
First, decide whether you want to create a picture or a random design.  If you decide to make a picture, draw it on paper first and identify which beans you want where. Making a mosaic is allot like a paint by number. There are two ways to make this piece of art.
Method #1
**If you have very young children you can draw a simple picture such as a fish or a heart. Once you have drawn the picture you can then glue the beans directly onto the cardboard.


Method #2
***If you have an older child, you can choose the clay method. To do the clay method you or your child would first cover his piece of cardboard with an even layer of modeling clay. After you put the clay onto the cardboard, you would then take a sharpened pencil and gently mark the design into the clay.This will help to guide you while placing the colored beans. (I have added some sample projects that are more complex and artistic.

You are now ready to begin the mosaic. Press the colored beans into the clay in the design you have created. 


Materials Needed:
·         A variety of dry beans, peas, red bean and lentils
·         Modeling clay
·         A firm surface such as cardboard (or foam board)
·         Glue

Directions:
Once you decide the size of your art work and which method, draw your picture and then proceed to either glue or place your bean into the clay. When you have completed your art work allow it to dry for at least 24 to 72 hours.

Friday, April 15, 2011

Worm Dirt Cake

Life has been chaotic lately, running for appointments, taking Alex for softball practice, Nicole for cheerleading, work, maybe taking care of your parents or an ailing Grandparent and in all of the confusion, you forgot to order the birthday cake. You have to pull something together in a hurry. Well, if you have children the "Worm Dirt Cake" will be the hit of the party.  Enjoy!!

WORM DIRT CAKE  

1 to 1 1/4 lb. pkg. Oreo cookies
1 (8 oz.) pkg. cream cheese
1/2 cup butter, softened
1 cup powdered sugar
3 cups milk
1 (12 oz.) tub Cool Whip (can use chocolate)
2 (3 1/2 oz.) pkg. instant vanilla or chocolate pudding
1/2 tsp. vanilla
4 gummy worms and/or other critters

This popular "novelty" cake is a hit at children's parties, especially around Halloween. You'll receive many appreciative compliments from your guests such as "Ewww, that's gross!" It really resembles a pudding more than it does a conventional cake. If you serve it as an everyday family dessert, rather than as a fun decorative element, it's possible that your family may not understand it!

Crush Oreos. Put 1/3 of the crushed Oreos into a new, clean flowerpot. Set aside.
Mix butter, cream cheese, sugar, and vanilla together. Set aside.
Combine milk and pudding mix. Fold Cool Whip into the pudding.
Fold together pudding mixture and butter-cream cheese mixture.
Layer this mixture (about 1/3 of it) onto the crumbled cookies in the pot. Next, add another layer of the pudding mixture, then another layer of cookie crumbs, continuing until all ingredients are used. As you're layering the ingredients, decoratively place several gummy worms and critters in the "soil" so they will be seen emerging. If you have a toy (clean) garden trowel, a plastic daisy, or some edible flowers, these can be used creatively to embellish the presentation.

Chill in refrigerator for 3 to 4 hours before serving.

Thursday, April 14, 2011

Easter Basket Project

Easter is just around the corner. Peter Cottontail will be hopping down the bunny trail right to your front door with these cute handmade bunny baskets. You can make them for your children, grandchildren or get the kiddies involved in a fun and easy craft project. This is an inexpensive craft project made from materials you may have laying around your home.
BUNNY BASKETS
Materials:
  • An empty, shoe box
  • Scissors
  • Big bag of cotton balls
  • Glue or glue gun
  • Pink or white yarn
  • Marker
  • Pink felt
  • Black or felt, black jelly beans, or black paper
Instructions:
Use the lid and draw two bunny ears the length of the lid. After you have drawn the ears, cut them out. Cut 2 ovals out of pink felt, foam or construction paper and glue in the center of your ears. Once you have done this secure your ears in place onto the inside front of the box. You can secure them in place with some heavy tape such as lduck tape. Once in they secured in place have the kids glue cotton balls around the pink of the ears and all over the entire bunny.
Once your bunny is dry add black eyes, and some whiskers and make a yarn tale by taking a few pieces of pink yarn or you can make a pop-pom and glue it on.

 Click to learn how to make easy Pom-Pom.


This is how it will look before the cotton balls are glued on