

Showing posts with label Christmas. Show all posts
Showing posts with label Christmas. Show all posts
Wednesday, December 7, 2022
Christmas is coming fast!
I haven't posted in a long time. My daughter is seriously ill and Im her full time caregiver. I will try to add new crafts in the coming year and keep my blog as current as I can, considering the circumstances.
God bless you all and have a Merry Christmas!

Saturday, December 3, 2016
Christmas Tree Advent Calendar
Materials Needed:


 1.Once you get your pattern cut then lay your tree on top of your foam board and trace your tree. The foam board will be the base for your advent calendar.


- 2 poster board
- Craft Glue
- Glue Gun
- Glue Sticks
- 3/4 Yard of green felt
- 1 Square of Yellow or Gold Colored Felt
- Glitter Glue (Red, and Gold)
- 1 Foam Board (any color)
- Snowflakes or balls for decoration
- Utility Knife and blades
- Scissors
- Pencil
- Chalk
- Straight pins
- Spongee paintbrush for graft glue
- Popsicle stick or wooden skrewer
- Dog Bones or Candy
Green felt was on clearance at Walmart and everything else we found at the Dollar Store here in Baltimore. This Advent Calendar is rather large and it cost about $10.00 total to make (material only)
Directions
Making the Pattern

TREE: The tree itself measures---from the tip to bottom it measures 22" inches tall by 13 3/4" inches wide.
Fold poster board in half, length wise and draw tree as shown in picture. I used 5 petals. I had to draw it twice to get it "just right" ---it's only your pattern so don't be hard on yourself if you mess up. I was able to get the tree, my base and the dog bone all from one piece of poster board.
BASE: The base is 13.5" inches wide and 5" inches high.
BONE or STAR : The bone is 5"inches in length by 2" inches high (in center) or make a star if you want it for children.
POCKETS:
Measure on poster board to make a pattern. Cut 1 of each
Measure and cut 5 1/2" wide by 2 3/4" high. (This will be for pockets 1 and 2).
Cut 8 3/4 by 2 3/4" (This is for pockets 3,4,5,)
Cut 11" wide by 2 3/4" high (this is for pockets 6,7,8,9)
Cut 13 3/4" wide by 2 3/4" high (this is for pockets 10,11,12,13,14)
Cut 16 3/4 wide by 2 3/4" high (this is for 15,16,17,18,19,20)
Cut 19" wide by 2 3/4 " high (this is for pockets 21,22,23,24)
*There is no pocket for 25.
It will look like this

Now that you have your pattern you are ready to begin making your calendar....
 1.Once you get your pattern cut then lay your tree on top of your foam board and trace your tree. The foam board will be the base for your advent calendar.
2. Fold your green felt in half so that you have two pieces. Now lay your foam board on top and trace your tree BUT and this is very IMPORTANT trace your tree but after you trace it trace again but measure 1 1/2 inches so that you have 1 1/2 inches of space around your original trace line. When you get doner you will have two chalk lines and you will be cutting on the second line. This extra space will allow you enough fabric for when you glue.

3. Now cut your fabric. After fabric is cut you want to sandwich the foam board in between the two pieces of fabric. Using your craft clue and paintbrush glue the felt onto the foam board (the foam board is in between each piece of felt).
I rolled a piece of 10" felt to make it look like a shoe lace and then I glued it to the back of the tree so that it could hang on the wall.
5. Cut 5 pieces of green felt for your pockets. I didn't make individual pockets
Each pocket will be 2 5/8" so stick a straight pin and you can either eye it up or mark with chalk. I pinned the pockets onto the foam board and then I carefully marked with chalk and glued them onto the tree moving along very slowly using the glue gun. I used a skewer to push it down as it got quite hot on the fingers. Once dry you can add numbers. I drew them lightly in chalk and then just traced over it. ***Let sit overnight to dry fully.

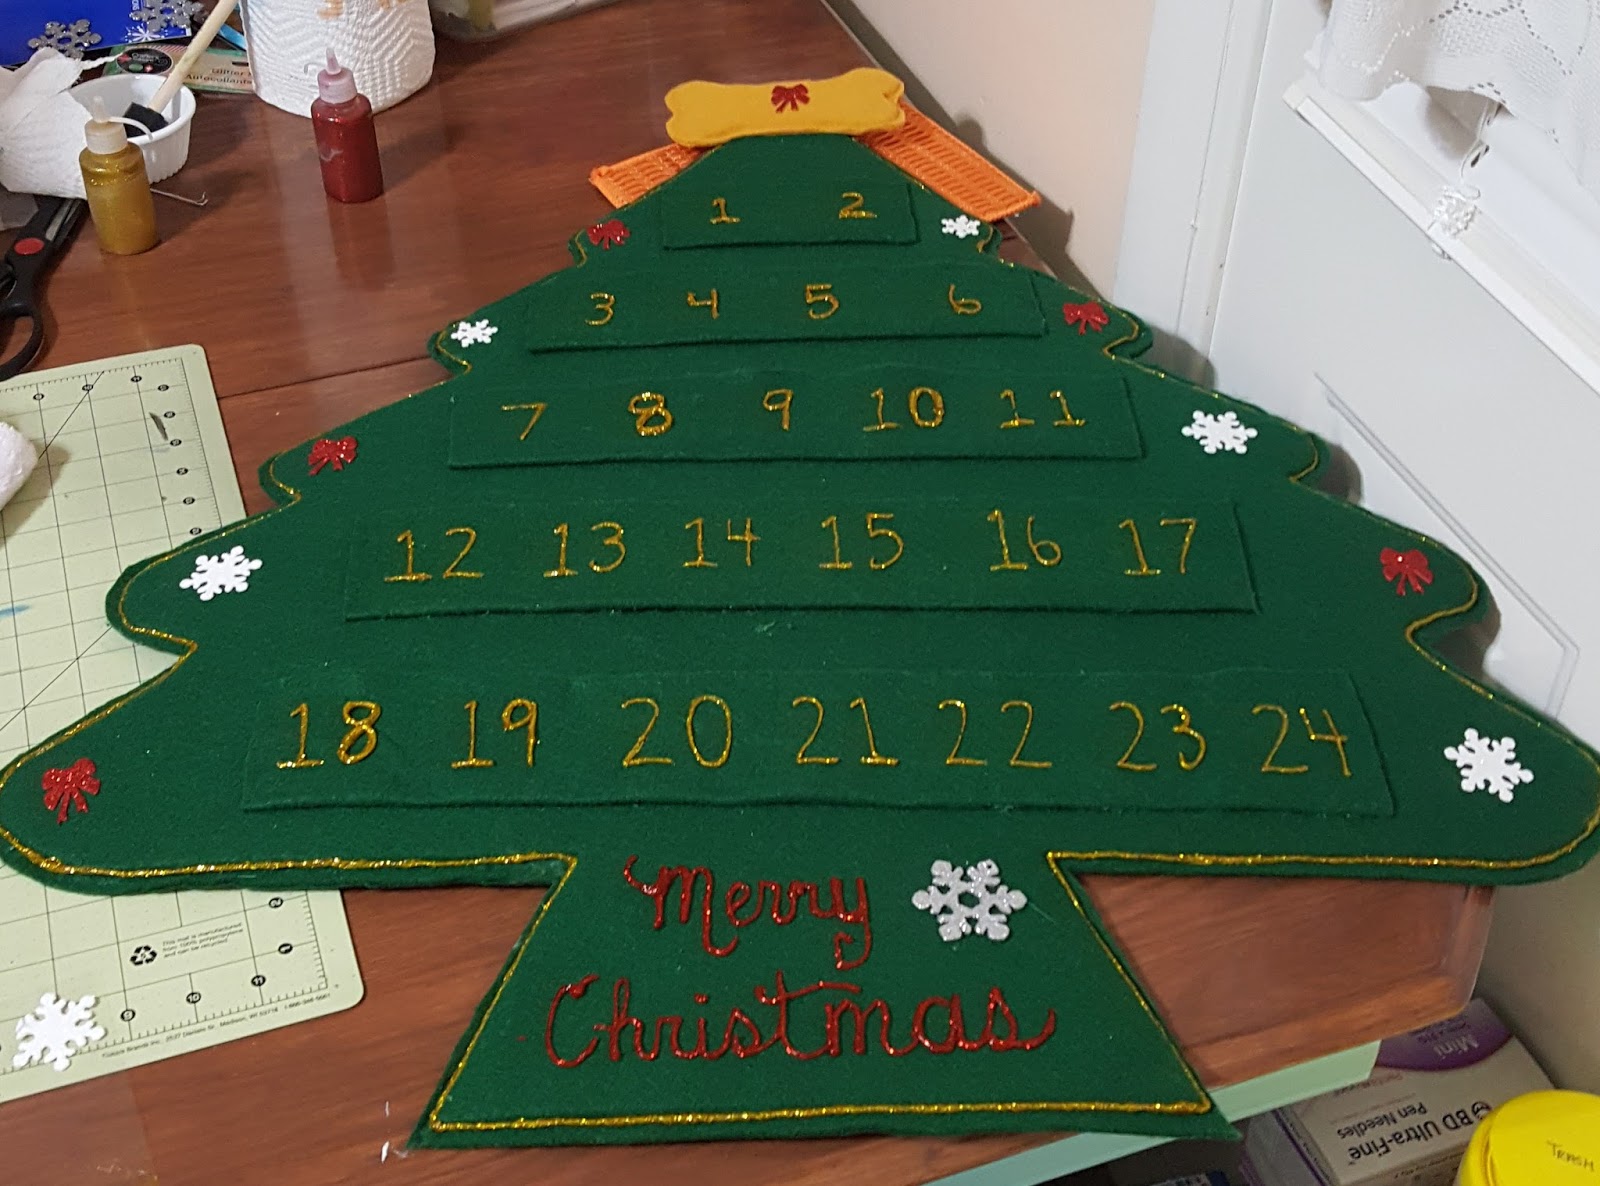
Finished product!
My niece wanted a "Doggy" advent calendar but you can make it for Children too. This one has a bone for the star but you can make a star if you want to do it for children.
Tuesday, November 29, 2011
Easy Christmas Wreath for the Moms

Here is a beautiful Christmas wreath that I made and it basically cost me a dollar for the wreath and another dollar for the ribbon ---plus things I had in my house.
Materials needed:
Pine wreath
Glue gun and glue sticks
Ribbon (for bow)
String of lights (optional)5-6 colored glass or plastic balls
Plastic snowflakes (optional)
Directions--Lay wreath on the table. Position ornaments and then glue with your hot glue gun. Position your bow and snowflakes then glue into place. After it dries add your string of lights and voila! you now have a beautiful wreath to display on your door or wall and it cost a fraction of what it costs in the stores today.
More holiday books--
Reviewed on Amazon--Fun, creative book for kids of all ages. We really enjoy the "Stinky Face" series of books. My only surprise was that it was a board book, but that's okay because I have a 2 and 7 year old. McCourt is so creative and if you don't have this book for Christmas, I'd suggest you get it. For more information

Humphrey's First Christmas
Reviewed on Amazon---"Incredible art work, visually awesome for children and adults of all ages. The story is just as touching, Humphrey wanted his blanket, that he had lost so bad, and once he got it, he gave it as a gift to the baby Jesus, what a wonderful story of giving. A book that is a treasure for all generations. For more information
Thursday, November 24, 2011
Rudolph the Red Nose Reindeer

Materials Needed:
Brown Foam
Wiggly Eyes
Craft Glue
Green Foam
Red Pom-Pom
Tan Foam
Ribbon(if you want to hang it up) or magnet (to stick on the fridge.)
Reindeer Templates
Directions:
Print templates and cut out. Once you cut out lay the templates on the foam and trace then cut out the design.
Glue ears and antlers onto the head of Rudolph. Once they are in place and secure you can wrap the wreath around Rudolph's neck and glue securely into place.
Now it's time to decorate. You can either use my picture of Rudolph as a guide and decorate to your satisfaction. Whatever you do have fun!
Books related to our topic:

Reviewed on amazon--"Another true classic from Mark Moulton with a wonderful storyline, lyrical narrative and incredibly beautiful artwork by Karen Good. Scarecrow Pete was my first introduction to these books and this, plus The Secret Santa of Olde Stonington, will complete all the Moulton books I have purchased for a collection for my grandchildren." For more info
Reviewed on Amazon--"Without a doubt, Morozumi's illustrations are the most beautiful we have seen. The story tells of Santa's decision to use reindeer instead of other animals to make his deliveries. Read this book to see how they were chosen. This continues to be a favorite in our household." For more info
Angelic Craft

Materials Needed:
White Foam
Yellow Foam (or Gold--if you can find it.)
Flesh Foam
Some gold or silver trim (fabric isle)
Craft Glue
Permanent Marker
Gold metallic Pipe Cleaner
White Lace

Open the template and cut the pieces out. Lay on top of foam and trace with a pen. Once you do that you can cut your foam pieces out. Glue arms to white body. Glue round head to top of body. Now you are ready to glue the wings to the back and the hands and feet.
Once everything is secure in place you can begin decorating. Just look at the pictures to see how to decorate or use your own style and decorate how you see fit. Doing crafts you can be as creative as you wish. As you can see my angel is different from my daughter's and that's okay...it makes yours unique.
Books related to our project--

For more info

Little Angels' Book of Christmas
Subscribe to:
Posts (Atom)