Showing posts with label drums. Show all posts

Tuesday, August 2, 2011

Coffee Can Drum

Kids love music and banging on pots, pans, and plastic containers. Combine their creativity with their musical talent by making this adorable homemade drum.

Did you know the drum is called a membranophone. Drums consist of a hollowed-out piece(called the body), a membrane stretched over the end of the drum, and tuning keys or pegs which tighten or loosen the membrane to achieve different tones.

While most may think that the body of the drum produces the sound, it is in fact the membrane and its vibration that creates the sound when struck. Drums first appeared as far back as 6000 BC. Mesopotamian excavations unearthed small cylindrical drums dated 3000 BC.

Wall markings were found in caves in Peru. They show drums used in various aspects of  life. The American Indians used gourd and wooden constructed drums for their rituals and ceremonies.

What you'll need:
  • Aluminum coffee can with plastic lid
  • 2 sheets yellow construction paper
  • 1 sheet tan felt
  • ½ sheet magenta felt
  • Magenta yarn
  • 1 rubber band
  • Scissors
  • Glue stick
  • White craft glue
  • 2 wooden dowels
  • 2 small foam balls
  • Blue yarn

How to make it:

  1. Remove lid from coffee can and set aside for a later step.
  2. Cover the side of the can with yellow construction paper. Use glue stick to apply glue all over construction paper then press on to the coffee can.
  3. Using the white craft glue, “draw” diagonal lines onto the yellow construction paper. Start at the bottom, go up at a slant to the top, and then go down from there at a slant, creating a triangle. Continue this pattern all the way around the can.
  4. Using magenta colored yarn, follow the glue lines and apply to the can. Do not cut the yarn into pieces; simply follow the lines, gently pressing the yarn into the glue as you go. Cut only once at the end.
  5. Lay tan felt on the work surface.
  6. Pipe white glue around and on the top of the plastic lid.
  7. Place the plastic lid upside down in the center of the tan felt.
  8. Use scissors to trim around the plastic lid, leaving a 1-2” border.
  9. Place the felt-covered plastic lid onto the coffee can and secure.
  10. Wrap the rubber band around the coffee can, securing the tan felt border to the side of the can. Gently pull the felt tight so that the top is smooth.
  11. Cut two ½-inch wide strips from the magenta felt, enough to go around the coffee can at the bottom as well as at the top, around the tan felt, covering the rubber band. Glue in place with white craft glue.
  12. To make the drumsticks, gently insert the end of a dowel into the foam ball. If you press too hard and the dowel goes through, just glue it back together.
  13. Remove the dowel, and then add some white glue to the hole. Reinsert the dowel.
  14. Cover the foam ball with white glue and wrap blue yarn around it until the ball is completely covered. (See image.)
  15. Put some glue on the dowel just below the ball and wrap some excess yarn around it. Trim and smooth in place with your fingers, be sure the end of the yarn isn’t sticking out.
  16. Allow everything to dry before playing your new drum!
Credit:KABOOSE

Books related to our topic:
"The Drum: A Folktale from India is an excellent little story that teaches love, respect, compassion, hope, charity, and good citizenship. A poor boy has only one wish: to have his own drum. However, his mother cannot afford the instrument. The sweet child understands though, and unlike today's often spoiled, demanding children, he doesn't whine or beg or throw a tantrum. He bravely accepts his family's situation" Reviewed by:Arcturus70
TO PURCHASE

"I have used this book for several years in my music classroom. I've used it to introduce percussion family, marching band,self-expression and creative compositions. The story itself is wonderfully done, but the illustrations make the book a treasure. My students ask to read this one during Read Aloud Week" Reviewed by:Cathie B.
TO PURCHASE 

Wednesday, July 20, 2011

Make Your Own Instruments

Summer is here and sometimes children get bored so why not strike up the band? Here is a fun project that you can make. Maybe you can put on your own concert or have a parade! (**Parental Supervison Required)


Tambourine

2 paper plates
stapler or glue
hole punch
string
jingle bells
crayons

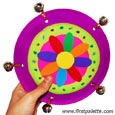
Directions:Staple or glue two paper plates together, facing each other. Using a hole punch, make holes around the plates and tie jingle bells to the holes with string. Decorate the tambourine with crayons. Shake to play.

Note: Heavy duty paper plates may be more durable for this craft.

Safety note: If using a stapler, an adult should do this. When finished be sure to cover the staples with scotch tape.


DRUM
empty oatmeal box with cover
yarn
pen
2 pencils
2 spools
construction paper
crayons


Directions:Before beginning, you can decorate the oatmeal box with construction paper and/or crayons for a colorful effect.Place the cover on the box. Use a pen to make a hole in the center of the cover and in the center of the bottom of the box. Through these holes, pull a piece of yarn long enough to hang around child's neck and down to their waist.For the drumsticks, place the spools at the ends of the pencils, secure with glue if necessary.Beat to play.

CHIMES

ruler or stick
washers
nail polish
string
mixing spoon

Directions:Hang the washers from the ruler or stick with pieces of string by wrapping the string around the ruler or stick and securing. Strike the washers with the mixing spoon to play.
Note: You can make this craft colorful by painting the washers first with different color nail polishes, such as red, gold, glittery, etc.


HORN

paper towel roll
waxed paper
rubber band
pen

Directions: Cover one end of the paper towel roll with waxed paper, secure it with a rubber band. Punch a row of holes along one side of the roll with the tip of a pen.To play, sing a tune into the open end of the horn.

CYMBALS

two matching pot covers
yarn or ribbon

Directions: Tie the ribbon or yarn around the handles of the pot covers. To play, strike together.

XYLOPHONE

tall glasses or jars
water
mixing spoon

Directions: Fill the glasses or jars with different amounts of water. The more water in the glass, the lower the pitch will be. Having less water in the glass or jar will raise the pitch.To play, gently strike the glasses with a mixing spoon.Note: This instrument should probably be played by older children in "the band" because of the use of glass.

COMB BUZZER

pocket comb
tissue paper

Directions: Fold a piece of tissue paper over the tooth edge of a comb. To play, hum through the tissue paper.

GUITAR

empty shoe box
rubber bands
ruler or stick

Directions:Remove the cover from the box. Stretch the rubber bands around the box.  Attach the ruler or stick to the back of the box on one end to act as the arm of the guitar. To play, strum or pluck the rubber bands.

HAND BELLS

2 paper towel rolls
hole punch
4 jingle bells
string or yarn

Directions: Punch a hole in each end of the paper towel rolls. Tie two jingle bells to each side of the paper towel rolls by running string or yarn through the holes and carefully tying off. Shake to play.


Books related to topic--
"Completely enjoyed by our 2 year old and his parents. Pictures are absolutely beautiful. Having the CD is useful. Each of the 14 tracks has a beautifully illustrated 2 page spread, which makes it easy to follow the music - the book and music work very well together. The text, which is written in a perfectly simple and direct and short manner so as to render it very useful, helps the listener focus on different aspects of the music and appreciate the music by putting it in terms we could understand more easily (e.g. for the Lion's March - "the strings are playing the lion's marching tune as he walks...Sometimes he roars loudly. Can you hear the pianos playing the lion's roar?") Our toddler loves classical music but this is a great choice for any child or adult. The entire package - the CD, the format of the book, the pictures and the text - really make this a great way of experiencing the music and just a plain good old story" Reviewed by: NK FOR MORE INFO


This series trys to copy baby einstein dvd's. While it is very corny, my baby and 4yr. old are obsessed with it. I have bought more! FOR MORE INFO