

Wednesday, December 7, 2022
Christmas is coming fast!
I haven't posted in a long time. My daughter is seriously ill and Im her full time caregiver. I will try to add new crafts in the coming year and keep my blog as current as I can, considering the circumstances.
God bless you all and have a Merry Christmas!


Tuesday, May 26, 2020
DYI L.O.L. Dollhouse

Starting from the bottom floor--there's a living room and kitchen (and stairs).
The 2nd floor-- consists of a bathroom, a small bedroom and a bigger room which can be either a den or a bedroom and contains the stairs. Their are 2 boxes attached that hold the battery packs for the lights.
The 3rd floor---consists of the patio/swing and a big bedroom.
Supplies:
- Boxes (about 5 very sturdy all the same size)
- Glue sticks (2 large packs)
- Strong wide tape
- Foam board (about 12-14 pieces)
- Contact paper (1 roll of marble, and 3 rolls of wood grain)
- Popsicle Sticks (2 packs)
- Acrylic paint
- Paintbrushes
- Save greeting cards or pictures from Band aid boxes or whatever to use for the walls
- Fabric glue
- 3 suction cups with the metal hooks
- Decorative flowers or heart sequins
- Any type of trinkets such as old Barbie house things.
- Stickers that you can use for book jackets
- Artificial flowers
- Twigs (from your yard)
- Fabric (You will need about 3-4 yards of some wood or brick type fabric--for outside of the house)
- You will need about 1/2 yard of fabric for each room in the house. So you will basically need 6--1/2 yards of colorful fabrics (your choice). Each 1/2 yard should be a different color or design as each room is different.
- 6 packs of miniature light from the dollar store.
- 2 packs AA batteries
We have a Goodwill Outlet here in our city and I'd go search through the bins looking for old Barbie stuff such as tiny miniature bottles, lamps, dishes. These make great add-ons for the houses and really help to make the houses personal and cute.
Directions:


 |
| Living Room |
 |
| Kitchen |
 |
| Bathroom |
 |
Small Princess Room
|

Thursday, October 3, 2019
DYI Town and Roadway for Matchbox Cars

My little 2 year old nephew loves matchbox cars. Store bought raceways are soo expensive and on a fixed income sometimes you just have to come up with an innovative way to make things fun and creative. My nephew thought this was the best thing since sliced butter. We would sit for house playing cars and riding them up and down the inclines on the bridges.

Supplies:
- Glue gun (I use the large gun and large glue sticks)
- Glue sticks
- 5 Foam boards
- Acrylic paint
- Popsicle sticks (large bag)
- Soda, milk lids for the signs
- A utility knife
- Artificial leaves for trees
- Twigs (6-7)
- Heavy duty tape
- Clear contact paper
- Ruler
- Pencil
- Paint brushes
- Compass
- Marbleized contact paper for the parking lots and sidewalks


Directions: Begin by gluing and taping 2 foam boards together to use as the base. Once you glue them together, design how you want you road to be. I forgot to measure the road but I measured a matchbox car and then allowed an extra 1/4 of a inch so that the car could ride on the road. Paint the road in black acrylic paint and after it thoroughly dries cover the entire board in clear contact paper. This will help the track to last longer, extend the useage for your child and keep the paint from messing up.
I apologize for not taking step by step pictures. I forgot and it was already done when I realized I should have added it to the website.

The tunnels were made out of foam board and then I placed popsicle sticks on top with the glue gun thus making it very sturdy. My nephew kind of destroyed the first one when he leaned on the tunnel to stand up---so I knew I had to come up with something more sturdy. I made all the houses and buildings out of foam board and then glued popsicle sticks over to help make them very sturdy. You can paint your buildings any color you wish. I made Nan's Sweet Shop, An auto/tire shop, a gas station etc...
One thing that I did---my little nephew would get very agitated when the cars wouldn't stay in the lanes so I measure a 1/4 inch foam board and glued them all the way around each roadway. Once I completed that I added popsicle sticks to help make it sturdy. By doing this it helped keep the cars in their lanes and on the road. The yellow strips in the middle of the road are thin popsicle sticks that I split and painted yellow.
ENJOY!!
Tuesday, October 1, 2019
Painted Rocks
Every spring I like to plant a garden and this year was no exception. One day my daughter and I were in a mood to do a craft and didn't have money to go a buy things so we decided to paint some rocks. Two rocks became ten and before we knew it people were asking us to make some for their gardens too.
It's a fun simple craft and you can use rocks for many things besides sprucing up a garden. They can be doorstoppers, paper weights, gifts, decorations etc...
Supplies:
- Rocks (all sizes)
- Guesso
- Acrylic paints (various colors)
- Spray finishing gloss
- Cardboard
- A mixing tray
- Pencil
- Various sized paint brushes
- Small fan (to speed up the drying process)
Directions:

- Once you choose your rocks, scrub them clean with a dish scrubber and a mixture of dish soap and bleach for disinfecting.
- Dry them on a drying mat, an old towel or even a few pieces of paper towels.
- Coat rocks with Guesso. Guesso helps the paint to adhere and stick better.
- Once the guesso is completely dry you can draw your design onto the rock.
- Now you are ready to begin painting. Paint the rock at least 3 coats of paint. Allow each layer to dry before painting the next. My daughter always rushes this process and thinks she can do just one coat but what happens is the rocks fade quickly and the paint does not hold up.
- When you are completely done painting spray the rock with clear gloss spray from the hardware dept. You can get a big can for under 4.00 but purchae in the hardware department in places such as Walmart. The craft store will charge more.
Here are some of the rocks we painted. They make great decorative rocks for a garden and gifts too.


Thursday, May 4, 2017
Service dog for my daughter
My daughter has been sick since the age of 11. She has some rare diseases and it's been a real struggle. We are raising money for a service dog. Here is the link where you can read about her and the obstacles she faces.
https://www.gofundme.com/a-service-dog-for-francessca
 This is Zayla! She's now 1 year old. We've been working at training but it's a very slow process. She's already trying to alert and help my Francessca. She's very eager and wants to learn. The trainer comes twice a month but she should either go to boot camp or see the trainer more often however with both of us sick we cannot afford to add more.
It might take us longer but she can do it and we are going to keep trying...with or without help. If you find it in your heart to help please click on the link. Thank you!!
PLEASE DONATE
Saturday, December 3, 2016
Christmas Tree Advent Calendar
Materials Needed:


 1.Once you get your pattern cut then lay your tree on top of your foam board and trace your tree. The foam board will be the base for your advent calendar.


- 2 poster board
- Craft Glue
- Glue Gun
- Glue Sticks
- 3/4 Yard of green felt
- 1 Square of Yellow or Gold Colored Felt
- Glitter Glue (Red, and Gold)
- 1 Foam Board (any color)
- Snowflakes or balls for decoration
- Utility Knife and blades
- Scissors
- Pencil
- Chalk
- Straight pins
- Spongee paintbrush for graft glue
- Popsicle stick or wooden skrewer
- Dog Bones or Candy
Green felt was on clearance at Walmart and everything else we found at the Dollar Store here in Baltimore. This Advent Calendar is rather large and it cost about $10.00 total to make (material only)
Directions
Making the Pattern

TREE: The tree itself measures---from the tip to bottom it measures 22" inches tall by 13 3/4" inches wide.
Fold poster board in half, length wise and draw tree as shown in picture. I used 5 petals. I had to draw it twice to get it "just right" ---it's only your pattern so don't be hard on yourself if you mess up. I was able to get the tree, my base and the dog bone all from one piece of poster board.
BASE: The base is 13.5" inches wide and 5" inches high.
BONE or STAR : The bone is 5"inches in length by 2" inches high (in center) or make a star if you want it for children.
POCKETS:
Measure on poster board to make a pattern. Cut 1 of each
Measure and cut 5 1/2" wide by 2 3/4" high. (This will be for pockets 1 and 2).
Cut 8 3/4 by 2 3/4" (This is for pockets 3,4,5,)
Cut 11" wide by 2 3/4" high (this is for pockets 6,7,8,9)
Cut 13 3/4" wide by 2 3/4" high (this is for pockets 10,11,12,13,14)
Cut 16 3/4 wide by 2 3/4" high (this is for 15,16,17,18,19,20)
Cut 19" wide by 2 3/4 " high (this is for pockets 21,22,23,24)
*There is no pocket for 25.
It will look like this

Now that you have your pattern you are ready to begin making your calendar....
 1.Once you get your pattern cut then lay your tree on top of your foam board and trace your tree. The foam board will be the base for your advent calendar.
2. Fold your green felt in half so that you have two pieces. Now lay your foam board on top and trace your tree BUT and this is very IMPORTANT trace your tree but after you trace it trace again but measure 1 1/2 inches so that you have 1 1/2 inches of space around your original trace line. When you get doner you will have two chalk lines and you will be cutting on the second line. This extra space will allow you enough fabric for when you glue.

3. Now cut your fabric. After fabric is cut you want to sandwich the foam board in between the two pieces of fabric. Using your craft clue and paintbrush glue the felt onto the foam board (the foam board is in between each piece of felt).
I rolled a piece of 10" felt to make it look like a shoe lace and then I glued it to the back of the tree so that it could hang on the wall.
5. Cut 5 pieces of green felt for your pockets. I didn't make individual pockets
Each pocket will be 2 5/8" so stick a straight pin and you can either eye it up or mark with chalk. I pinned the pockets onto the foam board and then I carefully marked with chalk and glued them onto the tree moving along very slowly using the glue gun. I used a skewer to push it down as it got quite hot on the fingers. Once dry you can add numbers. I drew them lightly in chalk and then just traced over it. ***Let sit overnight to dry fully.

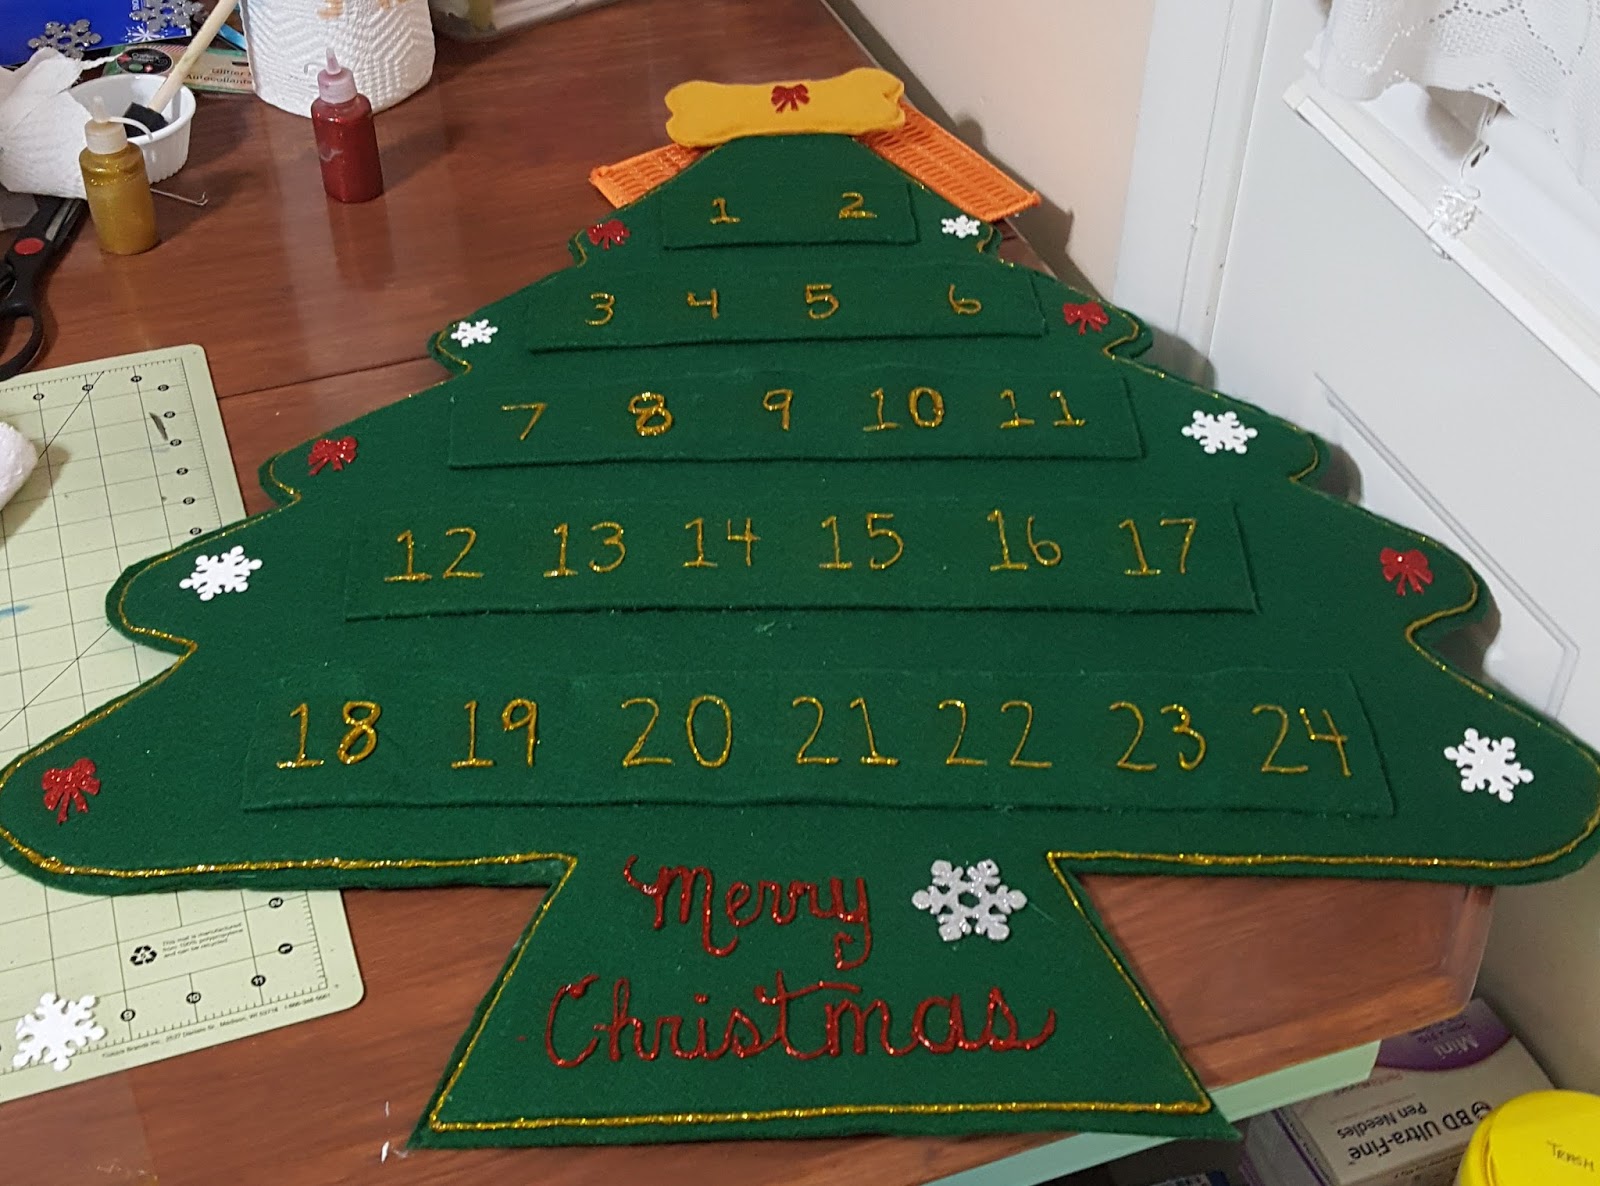
Finished product!
My niece wanted a "Doggy" advent calendar but you can make it for Children too. This one has a bone for the star but you can make a star if you want to do it for children.
Saturday, October 15, 2016
School Year Template

My niece (her Mom) Brandi made this. She found the idea on Pinterest and she and her sister recreated the idea.
Materials Needed:
- Large Foam Board (from the Dollar Store) or Cardboard
- Aluminum Foil
- Scissors
- Large Marker
- Compass
- Tacky Glue
- Craft Paints (White, Yellow, Red and Silver)
- 1 piece of chalk
Directions:
- Depending on the size of your poster board cut a rectangle shape about the size of 12 x 18 out centered and about 3 inches from the bottom of the board.
- Cut 2 large circles out. The circle will need to be approximately 4"
- Next--cut 2 small ovals and 2 larger ovals and then 1 extra large oval.
- Paint the two smaller ovals with silver paint.
- Glue everything in place using the photograph as your guide.
- Once everything is glued you can add the grade. Write it in chalk so that you can use again and again.
Wednesday, October 12, 2016
Modpodge Picture Coasters
 My niece made these for Christmas presents. Her husband is a contractor and had leftover ceramic tiles.
Supplies:
- Ceramic Tiles or even blocks of wood will do.
- Choose pictures, a magazine photo or print one on your computer (cut to fit)
- Mod Podge
- Felt
- Flat paintbrush or sponge brush
Directions:
- Position the picture onto each tile
- Glue in place.
- Once it dries coat with Mod Podge Give it several coats. You must let dry between each coat. Be careful so that you do not get air bubbles. If you do you can smooth it out with your finger.
- When the tile is completely dry add a felt backing so it doesn't slide or scratch your tables.

In case you don't know what mod podge is this is what it looks like and it can be bought at Walmart and any craft store.

Monday, October 10, 2016
DIY Decorative Lamp Shade
 I had a small lamp on my vanity that had a tiny lampshade. I tried to add a larger shade but it just didn't look right yet the little one didn't look right either so I had to improvise. Since I love anything that shines and glitters. I decided to add beads to it. I bought some tiny crystal beads from Walmart and strung about 12-15 per string. I knotted the first bead so that it wouldn't slip off and then I just continued stringing them and sewed them onto the lampshade.
It turned out so cute and looks perfect on my vanity. I wasn't planning to add it to this page but I thought someone might like the idea.
So enjoy!!
Here is a link to the crystal mirror I also did awhile back that's also on my vanity.
http://franandfriends.blogspot.com/2013/03/mirrormirror.html

Saturday, January 17, 2015
Remembering Our Furry Friends
It's winter time here in the United States. The temperatures are frigid and there is ice everywhere. I thought it would be a great time to think about animals outside who have no home and our wildlife.
 Today on the news there was a woman from the SPCA and she had a great tip for stray cats. She took a Styrofoam cooler and cut a hole in the base. She filled the bottom with some shredded papers and put a brick on top so it wouldn't blow away. She said don't put blankets because they freeze and become hard.
Another idea is feeding the birds. My daughter and I used to make bird feeders. Even though I posted this before I think it's worth mentioning due to the frigid temps.
BIRD FEEDERS
As well as pine cone,peanut butter feeders
PINE CONE/PEANUT BUTTER FEEDERS
If you have pets please bring them inside.
Another idea is feeding the birds. My daughter and I used to make bird feeders. Even though I posted this before I think it's worth mentioning due to the frigid temps.
BIRD FEEDERS
As well as pine cone,peanut butter feeders
PINE CONE/PEANUT BUTTER FEEDERS
If you have pets please bring them inside.
Friday, July 18, 2014
Point Me In The Right Direction

Here's some photo's that Fran took so that you can see how it's done step by step.


Books related to our topic---
Robin Hood And The Golden Arrow

Robert San Souci retells the classic and humorous tale of Robin Hood and the Golden Arrow. Acclaimed author Robert San Souci and Caldecott Honor illustrator and Coretta Scott King Award winner E. B. Lewis retell the classic legend of Robin Hood and the Golden Arrow.
Robin Hood and his loyal band create a plan to outsmart the Sheriff of Nottingham by attending an archery contest in disguise. In the end, it is Robin Hood and his friends who have the last laugh.
Kids of all ages will cheer for this classic tale based on the traditional story of Robin Hood.
The Apple and the Arrow

The year is 1291, and Walter is the twelve-year-old son of William Tell, the greatest bowman in the land of Uri. Walter lives happily in the remote heights of the Alpine Mountains, caring for his family’s goat herd and practicing his marksmanship in the hopes of making his father proud. But as the end of the year approaches, Walter’s peaceful life is shaken as his country enters a revolution, and Walter must carry a secret that could threaten the life of the father he loves so dearly.
More than seven hundred years have passed since the day Walter stood in the marketplace balancing an apple on his head while the Austrian tyrant Gessler commanded Walter’s father, William Tell, to take aim at the apple with his great crossbow. The dramatic tale of William’s arrest and escape and the daring revolt of the Swiss against the Austrians has become a legend around the world.
Wednesday, July 16, 2014
Froggie Went A Courtin...
Thursday at IV infusions the Child Life Specialist gave Fran several craft projects. One was a beaded frog. It took about an hour to complete.


Written by Jacqueline Rankine-Van Wassenhoven
This picture book story is for everyone who is young at heart or older. It’s about a young girl called Jennifer who loves to read books, especially books about water fairies. One summer’s day sitting by the pond near her village she meets a talking frog named Waldor. Waldor is quite a charming character and introduces Jennifer to some of his friends, the water fairies and Mrs. Nightingale. How does Jennifer get onto the lily pad with Waldor?…And the story continues.
Amazon Review--"Everyone loves to be taken away to another place and time. A Frog Named Waldor will give you just that chance to escape into the magical enchanted forest with Jennifer,the fairies and a quite lively pond frog named Waldor! Enjoy this read as I definitely give it 5 stars!!"

The Fabulous Adventures of Fred the Frog
Fred is a friendly frog that lives in a pond he calls home. He is surrounded by many caring friends including Betsy the Butterfly, Hermit the Frog, and the well-known Mr. Flyman and his band. They pass their time singing and dancing to many favorite songs. On Fred’s seventh birthday he blows out his candles and makes a wish. To his surprise his wish is granted! Come join Fred and friends on his journey to many fabulous adventures and discover if he chooses to live in the magical place he wishes for.
Fred is a friendly frog that lives in a pond he calls home. He is surrounded by many caring friends including Betsy the Butterfly, Hermit the Frog, and the well-known Mr. Flyman and his band. They pass their time singing and dancing to many favorite songs. On Fred’s seventh birthday he blows out his candles and makes a wish. To his surprise his wish is granted! Come join Fred and friends on his journey to many fabulous adventures and discover if he chooses to live in the magical place he wishes for.
Subscribe to:
Posts (Atom)